Thursday 10 October 2013


Working with Super White Footage in After Effects


After struggling with this for ages, I finally found a fix. If you shoot with any of the more modern cameras which shoot in a YUV colour space, you may well encounter the famous "super white" phenomena. This is when a camera is capable of recording detail above 100IRE or 235 in RGB terms, often creating details as high as 120 as seen on a waveform monitor like this: 


This is a sample of an mp4 file straight from an EX1, and although some of the peaks are obviously crushed, detail does exist above 100% Now some NLE's such as Edius handle this very well, however, if you hand off this clip to After Effects for additional processing, AE, as an RGB based application will strip the top off the file, leaving large amounts of data missing from those peak white areas, and leaving you with blocks of detail less whites.

I searched the net and asked many questions on forums about this and drew a blank, kinda giving up on this completely. 

This is what AE does to your peaks, the clip is "limited" to 100 IRE and all the detail has been destroyed:


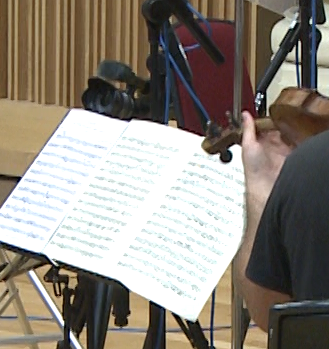
This shot shows that all the writing on the score has been crushed out of existence, creating an ugly white block, rather than a detailed shot.

Today I found an answer - Open your AE project and set it to 32 bit floating point, leaving the working space as "none".


now import your footage, and add an Exposure plug to bring the highlights to within the correct 100% limits, this will preserve the details in the whites on export, with 32 float, AE is able to resolve the full gamut of information, and allow you to adjust the highlights correctly, rather than trashing them.


Colour Finesse scope showing whites brought down to acceptable level without detail loss.


A more sophisticated method is to use Colour Finesse 3 which ships with AE, and has good scopes to do a Luma adjustment to bring the levels into line, the YCbCr setting gives very accurate control of luminance levels and gammas.

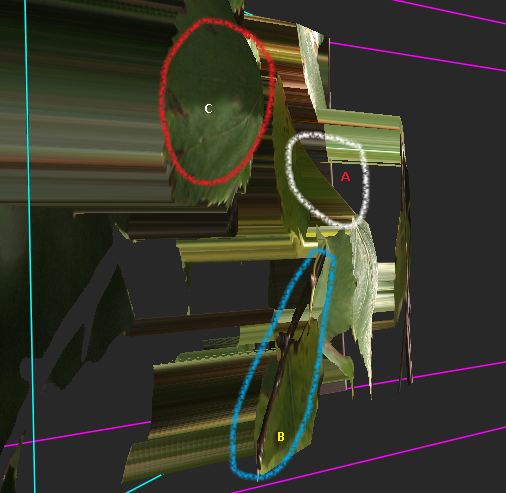
This is an example of a corrected clip:


Voila!

As you can see, all the detail has been retained, and will be preserved on export.

Using Colour Finesse 3 does have a greater impact on resources, and increases render time over the simple Exposure plug.

I hope this helps, it took me forever to find this simple fix for dealing with Super Whites in After Effects.


Liability Insurance

Liability Insurance through Ashburnham Insurance Services

Paul Bates is covered for:

Public Liability Insurance: £5,000,000

Saturday 17 August 2013


Sad to say goodbye to my fabulous all-terrain camera vehicle - 9 years excellent service.

Thursday 18 April 2013

NIKON D5200 Impressions


I needed a new good quality semi-pro camera, which will save stills as RAW files as well as jpeg's.

The new Nikon D5200 has been receiving great reviews, so, having owned a D40 some years ago, I took a chance and picked one up.

Hoping to use the apparently great video shooting capabilities of this camera to record extra "B" roll footage, I set about testing the video abilities of this camera.

HDMI - Not!

HDMI output is supposed to be clean and capable of external recording on a Ninja or a Black Magic Hyperdeck - so far, I can only get a "cropped" output from this camera - too bad - also when you put the camera into record, the HDMI output reverts to 720 and not 1080 at all - pretty crap for trying to record backups to your internal SDHC card at the same time as recording on the Hyperdeck or Ninja 2 - even if you could!


"Bag of Snakes"

D5200 has an external audio input with level controls - YAY!! sorry to piss on your fireworks but the external input has an appalling noise ceiling, making it useless for even the most amateur use - meanwhile the internal camera mic suffers less from amplifier hiss 

"Grain and Gain"

When set to manual control of video settings such as iso, F-stop and shutter speed, the visual noise levels increase as you zoom in - indicating that the iso level is changing to compensate for the aperture change during the zoom. Brightness does not increase, but the overall noise level does.

"Alias Moiré and Jello"

On the up side, this camera shows almost no moirĂ© or aliasing at all - good 24MP sensor then - BUT - awful "Jello" so never use this camera with fast moving pans  - best stick to
a tripod or slider here and go slow - especially if you are using 24P - depth of field is of course tight as a ducks posterior, so use high F- stops for greater depth when shooting video, if you need it, and try to stick to anything under iso 3200 for least noise. 

Update: The extreme Jello effect seen in Live View on the monitor is just that,
only on the monitor, no idea why, but the effect is much reduced on your recorded data.
page 49 of the handbook.


Tuesday 2 April 2013

Video Noise Reduction

Neat Video Noise Reduction software is great, no doubt. You can find it here:


It plugs into loads of things - even Edius.

However, have you considered this? Magic Bullet Denoiser II ?

You can find some information here:


I'm afraid it doesn't plug into quite as many applications, and does not work
with Edius via the AE plugin bridge ....BUT...

give it some thought - as in my humble opinion, it is

BETTER!

it is also really fast now as it supports
GPU acceleration - so before
you follow the crowd, check out the 1.4 version of
Denoiser II

These samples come from a Sony EX1 35mbs. All are shown at 800% enlargement.
The sample frame is identical, noise reduction at default, both running in interlace mode
as the original was 50i.

original shot at 800%
after Neat 3 clean up

after Red Giant Denoiser II clean up

I find that the detail retention of Denoiser II is better, note the spider web looks smoother
with the Red Giant plug, but the detail is retained - I also find there is less in the way
of "plastic" colour characteristics with Denoiser II.

They are both undoubtedly very good tools.


Tuesday 5 March 2013

REMOVING ECHO FROM AUDIO

Before you think this is going to cure all those nasty echo problems, it won't, but it may get you out of a spot when you've undertaken that crucial once in a lifetime interview in a  tiny, bare dressing room with that Hollywood star who simply had "no time darling" to allow a more suitable venue to be found - too bad, you have your interview but it sounds rough - fine for the news media and stinky old You tube, but rubbish for that documentary you have to get out by the middle of next week.

This will NOT remove the echo (liveness) from the actual words spoken by our hero, but will assist in dumping the awful ambience that makes it sound like you were in a public convenience during your chat.

First off, your interview will need to have been properly recorded, not using a handycam 20 metres away, there's no fix for poor craftsmanship - 

You will need a fairly good audio platform to do this - I used Audition recently to solidify some voice recording, and "pull it forward" - creating dialogue which, whilst not perfect, was certainly absolutely useable in the context of the documentary for which it was recorded.

Geeez, I forgot to finish this post! 

1) Open up Audition, import your audio and set to multitrack view.
2) Place your clip on track 1 and copy to track 2 as well, directly below, and set the lower track phase change on.
3) Play the session - you should have silence as the 180 degree phase difference
should entirely cancel out all the audio
4) Now add the Multiband Compressor to the top track and begin to play with
the settings - use the "ganged" setting to start with. Be very careful, take your time, this is not an instant fix.
5) The resulting audio will have all the echoing gaps between the words removed but without the pumping and clipping associated with gating, and the overall dynamic will be reduced - but you will still hear the "live" sound of the echo in the voice - this you have to put up with.

Adjusting the levels within the Compressor very slowly, and maybe setting the master gain in the Compressor to +1.00 will add a little ambience back into the mix.

 
Two tracks with phase change = no audio on playback


 6) When happy, send both channels to a Bus (mono) This will allow you to add further EQ and noise reduction to the stream without upsetting the echo removal process. 


Have the limiter off, carefully adjust levels (ganged is easiest to start with) and
play with the overall gain for ambience mix.

At this stage add EQ to the mix-down Bus - I usually use 30 band, as well as De Esher and or De Esser - if needed. 

As the upper middle, and top response get very rounded off in the processing to dampen the echo, it's a fine line between acceptable, then too much EQ or additional processing, least is always best, so go carefully, make a file and test in your project - I often make several versions to get the best results on different sections of the original recording.

adding a bus to create a downstream mono mix for additional EQ and Noise reduction
Have fun, hope this helps!

Wednesday 27 February 2013

3D Conversion Tests -Depth Mapping


Image shows a still from the depth mapped conversion: source material is a Sony EX1 shot,
the finished clip is shown below:

Anaglyph clip of finished conversion

The shot below shows how the leaf stalk "A" is leaning back
in Z space, as it really does, likewise, the branch "B" has had a similar treatment.
Leaf "C" has had convex distortion centred on it to give the leaf a Z space bulge, imitating it's natural shape on the tree.


Saturday 23 February 2013

FOR PC and NVIDIA USERS


Ever wondered why nothing ever looks right on you PC or Laptop? Everything you use to play media on messes with your set ups, just like that new 60inch screen you took delivery of last week - looks like hell until you turn off all the "auto" settings and align the monitor to deliver an acceptable image from a known source - something you shot, edited and know intimately.

So far so good - look at the video controls available for windoze media player, or VLC or anything else - you can tweak them, but they often get dumped when you change media or when you restart your system - not too helpful.

1) Make a nice mp4 HD file of something you know well - this will play in almost everything, especially if you encode using "Main" profile and not "High" This will stop good old Quicktime Player from freekin out. Use a high data rate like 15mbs. You can also download my two set-up files below if you prefer.

2) Right click on your Laptop or PC monitor and access the NVidia Control Panel, select video at the bottom, and "Adjust Video Colour Settings" Now take control of your system and answer the question "How do you make colour adjustments" answer: "With the Nvidia Settings! This will enable YOU to decide what your media player windows look like and not some random application.

set up as shown here:


 These are settings for my Sony Vaio, it stops burn-out and excessive contrast, setting the dynamic range to 0-255 forces the player to show correct black levels as well as unclipped peaks.


Newer NVidia Drivers will display the above options - make sure these are un-ticked.

Now you are in control, set your screen to provide exactly the viewing parameters you need - making it possible to use your laptop as a basic reference - it will never be perfect, but this may help.

If you use Power DVD player, make sure you turn on Nvidia hardware Acceleration which will turn off all the pre-set visual excitement available from Cyberlink, and will render your images to your personal setting.

Use My Files Here:

Black Level Set-Up File

Start with this this black level file, it has 0% black, 5% and 10% with a centre 3% chip. Make sure you can just see the centre 3% chip - and I mean JUST. Start with the controls set to 50% then reduce the brightness one notch at a time and update each time, then play - this is very sensitive -  you will find a point when the 3% chip vanishes, just add one and you are ready to adjust the contrast. 

Peak White Set-up File

Now open this  Peak White set up file, after downloading it. It has a 100% white background, a 98%, 95% and 90% chip. View this file on your media player - can you see all 3 areas? the 98% will just show against the 100% background when correctly set - if not, reduce the contrast setting in your Nvidia Contol Panel in 1% increments until you see the 3 areas - remember to "apply" each change, then play the file (have both windows open at the same time) this will update the player settings each time. This is super sensitive, you really only need to detect the centre 98% chip

Once set, you should be fully aligned and ready to play your files with pretty accurate results.

Oh, here's a Pluge file to identify whether or not your monitor is showing 0-255 or not.
It consists of horizontal bars from bottom to top showing 235-254 and a 254 chip in the centre, it looks like this:


235-255 Pluge File

Monday 18 February 2013

IDE to AHCI in Windows without re-install


I came across this issue the other day, having run a new install on a caddy drive of win 7 64bit - I discovered that my Bios settings were marked as IDE for all drive ports, including the external eSata - this is really dull - speeds are hugely reduced, plus you don't get "Hot Swap" capability with external drive bays thru' the eSata port unless you are running in AHCI mode - you have to make sure AHCI mode is set in the system bios befeore you install windows or you're buggered - you need to set the bios correctly and re install - very tedious - except...


There is a way to safely enable AHCI mode. Be very careful in the 
registry, failure to do this right, or damaging other registry keys
can and will terminate your system for good -
BEWARE - I accept NO responsibility if you screw up.

1. Start, type "Regedit" in search box.
2. Open HKEY_LOCAL_MACHINE / SYSTEM / CurrentControlset / Services
3. Open msahci 
4. In the right field left click on "start" and select Modify 
5. In the value Data field enter "0" and click "OK" (you may have a 3 as the value here)
6. exit "Regedit" 
7. Reboot your computer and enter BIOS (hold "Delete" key while Booting)

8. In your BIOS select "Integrated Peripherals" , Now change SATA Mode from IDE to AHCI not forgetting eSata further down the list if you have it ,

9) Save and exit your bios - computer will re start - during post you will probably see the 
AHCI drivers load and list your drives.

Friday 8 February 2013

Experimenting with 2D to 3D conversion

As the title says, I'm doing more experiments with converting 2D to 3D - er why? I hear you ask - well it's truly simple - I'm in the process of collecting footage for a short film about Dartmoor - a wild and beautiful region in the south west of England.

This is intended as a 3D production, but I have a problem: for those serious close ups of plants, flowers and details like this:


.... I need a 3D rig, capable of shooting with a very narrow IO ( interocular - the distance between the cameras eyes )  As this production is self funded, I do not have the necessary  to splash out on a mirror rig and the all important preview hardware to make this possible, and, climbing rocks with complicated set-ups, requires an assistant - well, most these outings are in pouring rain, snow and fog - my only companion being "Molly" the yellow labrador.

So, I'm looking for a software solution that will allow me to track a 2D camera move of a macro shot taken with my EX1 or 5D and then solve the move in 3D space. This then enables a depth map to be generated which positions the contents of the shot in 3D space. I've used a few "cod" pieces of conversion software - results are appalling, I need something like Nukex or PFDepth to get serious Hollywood results. 

Here's my first rough test:

2D to 3D Test

and another one:

Garden Leaves

and here's the shot of the daisy after creating about twelve tracked depth maps, and setting relevant positions in Z-Space - movements are very subtle, as it was a quiet sunny day when I shot this..

The Daisy macro

Hazel Tree leaves from Sony EX1 - 2D to 3D

These results are a great improvement on the earlier test shown a few posts down

Friday 11 January 2013

So here comes Glasses Free 3D for real:


and

clip

This is where Glasses free will really take hold - 24 multi view encoding linked with parallax barrier screens that display many angles, making it suitable for crowded viewing without ghosting or typical lenticular "sweet spots"

Monday 7 January 2013


So now I can link into the Adam Ant Cool Zombie clip I cut:


Shot by Zoran Veljkovic on RED and Post Produced here using Edius 6.5 and a bit
of After Effects CS6. Lovely and filmic, carefully graded.