
Thursday 11 May 2023
Sunday 16 August 2015
30 Years Ago....
This is a shot of my edit suite in Islington, London - set up in 1985/6 using U-Matic tape decks, Timebase correctors, Timecode Generators and all kinds of funky hardware - most notably, the CEL P147 and 151 Framestore !! super cool dudes... all built by my business partner Simon Garton, and myself..

Tuesday 19 May 2015

PFCLEAN
Whilst shooting some surf footage a couple of weeks ago, a Canon stills camera fitted with a 300mm lens, which was being used to capture some from shore action was dropped - small particles of sand got onto and into the lens.
During the edit session, a couple of the shots proved to be worth keeping, and whilst we were running a 2:35:1 crop and lost much of the edge dirt, de -focussed blobs still existed.
To the rescue, PFClean.
I exported the 1920x1080 progressive clips as DPX files which is the PFClean source file requirement, it accepts not, any .mov or other stream of vision. I used a default DPX output from PPro CC14 - which does this job very quickly, and imported the folder to my newly set up project in PFClean. In the filter section I selected "Clean lens dirt" This filter requires you to select marquee areas where the dirt exists, you can do them one at a time, or multiples, preview allows you to see the result immediately, and very impressive it is too - the larger the area selected, the longer the processing time is, but on my 16 thread 4.5gHz system, it was almost always pretty well instant.
It is possible to set the dirt detection to Dark, Light or both, multiple passes of the same area usually result is image aberrations, some testing and fiddling is required for best results. I was not able to find a way of saving the "map" of a particular dirty lens for use on other clips - maybe there is a way, but not obvious.
As with all post remedial work, not everything cleaned perfectly, but it rendered shots use-able where previously, there was doubt about including them.
whilst there are still some residual errors which I did not bother to worry about as they were cropped out in the edit, the final movie clips were a huge improvement.
Dylan's video is here:
Making my own surfboard
 |
| shot before treatment |
 |
| and after |
 |
| top left corner at 200% before cleaning |
 |
| and after cleaning. |
Dylan's video is here:
Making my own surfboard
Wednesday 6 May 2015
Stop Spotify from updating itself:
1. Close Spotify
2. Go to %appdata%\spotify
3. Delete Spotify_new.exe if it exists
4. Create an empty text document, rename it to Spotify_new.exe (if you don't see .txt etc. activate file extension's first).
5. Right click on the Spotify_new.exe and go to the properties, set the attribute Read-only.
6. Download old Spotify 0.9.7.16 from filehippo (google spotify filehippo 0.9.7.16).
7. Install it.
8. Have fun.
Sunday 3 May 2015
Goodbye Joseph
I was saddened today to hear that my friend Joseph, died after an accident
whilst cycling home from San Carlos on the island of Ibiza.
whilst cycling home from San Carlos on the island of Ibiza.
Joseph was a lovely guy, very gentle and, what is really hard, is that his son,
is now left alone, as his mother died recently, from cancer.
Sometimes, this God forsaken planet throws more at you than you
can reasonably handle.
can reasonably handle.

Thursday 10 April 2014
Back-Bone Rib Cage modified 3+

This is my modified GoPro 3+ fitted with a C mount 8-50mm zoom lens with manual iris. The lens is cheap, and designed for surveillance cameras, despite this it produces pretty decent results, however it is a pig to focus almost 3K images on the bacpac screen - so I intend to fit a 3.6 mm distortion free wide angle lens to this one, set the flange back and I'm good to go.
 |
| with Canon J6X12 |
Ripping the GoPro to bits and rebuilding is not for the faint hearted, but Back-Bone produce videos and a comprehensive pdf to help you along.
Bokeh samples from this rig here: https://www.youtube.com/watch?v=fLW5WHTAgT8&feature=youtu.be
Monday 7 April 2014
GoPro v2.0 firmware Update - NO!!!!

If like me you were excited to see GoPro's release notes for the Hero 3+ which included things like manageable iso settings!! better control of detail settings and so on, you, like me probably rushed to install.
Great, start testing - high quality HDMI output showed the advantage of setting the iso max to 400 - reduced noise in darker settings - all good - so I started to shoot a few tests.
Upshot is that suddenly, without investing in Sandisk Extreme cards at $90 for 64gb you lose the 46mbs data record rate accross the board so the beautiful 2.7K wide images become noisy and display encoding artifacts - you are stuck with 35 mbs because the firmware now detects your card type and throttles accordingly.
Also I have trouble resolving the same exposure/colour/detail as with the 1.04 firmware - despite trying every combination of set-up available in the now extensive Protune settings list.
I spoke at length to GoPro engineering who say "tough shit buddy - you're stuck with it, and we do not offer a roll-back service."
I decided today to roll-back my camera or break it in the attempt.
visit:
and download the version 1.04 drivers. Unpack and delete all files (3) marked with .10 suffix. Place the 3 files with .11 suffix in a folder called UDATE and place this folder on a clean micro sd card.
These are the files that should be in the UPDATE folder:
HD3.11-firmware.bin
update.11.txt
WF3.11-app.bin
Place a newly charged battery in you 3+, insert the sd card with the UPDATE folder and turn on the GoPro. Wait for it to finish update and voila, you are returned to lovely version 1.04.
I take NO RESPONSIBILTY if your camera is damaged in ANY way using the above procedure.
Thursday 10 October 2013
Working with Super White Footage in After Effects

After struggling with this for ages, I finally found a fix. If you shoot with any of the more modern cameras which shoot in a YUV colour space, you may well encounter the famous "super white" phenomena. This is when a camera is capable of recording detail above 100IRE or 235 in RGB terms, often creating details as high as 120 as seen on a waveform monitor like this:

This is a sample of an mp4 file straight from an EX1, and although some of the peaks are obviously crushed, detail does exist above 100% Now some NLE's such as Edius handle this very well, however, if you hand off this clip to After Effects for additional processing, AE, as an RGB based application will strip the top off the file, leaving large amounts of data missing from those peak white areas, and leaving you with blocks of detail less whites.
I searched the net and asked many questions on forums about this and drew a blank, kinda giving up on this completely.
This is what AE does to your peaks, the clip is "limited" to 100 IRE and all the detail has been destroyed:

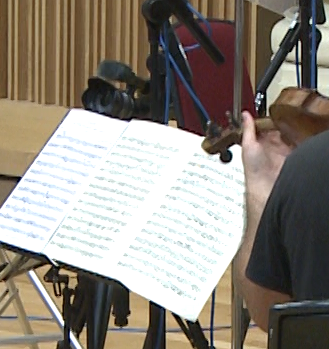
This shot shows that all the writing on the score has been crushed out of existence, creating an ugly white block, rather than a detailed shot.
Today I found an answer - Open your AE project and set it to 32 bit floating point, leaving the working space as "none".

now import your footage, and add an Exposure plug to bring the highlights to within the correct 100% limits, this will preserve the details in the whites on export, with 32 float, AE is able to resolve the full gamut of information, and allow you to adjust the highlights correctly, rather than trashing them.
 |
| Colour Finesse scope showing whites brought down to acceptable level without detail loss. |
A more sophisticated method is to use Colour Finesse 3 which ships with AE, and has good scopes to do a Luma adjustment to bring the levels into line, the YCbCr setting gives very accurate control of luminance levels and gammas.
This is an example of a corrected clip:
This is an example of a corrected clip:

Voila!
As you can see, all the detail has been retained, and will be preserved on export.
Using Colour Finesse 3 does have a greater impact on resources, and increases render time over the simple Exposure plug.
I hope this helps, it took me forever to find this simple fix for dealing with Super Whites in After Effects.
 |
Liability Insurance through Ashburnham Insurance Services Paul Bates is covered for: Public Liability Insurance: £5,000,000 |
Saturday 17 August 2013

Tuesday 7 May 2013
This Station Closing Down
http://www.youtube.com/watch?v=TpQ9bnO-ZEw&feature=youtu.be

Joan Elena Bates 1923 - 2013
Laid to rest 23rd May 2013

Joan Elena Bates 1923 - 2013
Laid to rest 23rd May 2013
Thursday 18 April 2013
NIKON D5200 Impressions

I needed a new good quality semi-pro camera, which will save stills as RAW files as well as jpeg's.
The new Nikon D5200 has been receiving great reviews, so, having owned a D40 some years ago, I took a chance and picked one up.
Hoping to use the apparently great video shooting capabilities of this camera to record extra "B" roll footage, I set about testing the video abilities of this camera.
HDMI - Not!
HDMI output is supposed to be clean and capable of external recording on a Ninja or a Black Magic Hyperdeck - so far, I can only get a "cropped" output from this camera - too bad - also when you put the camera into record, the HDMI output reverts to 720 and not 1080 at all - pretty crap for trying to record backups to your internal SDHC card at the same time as recording on the Hyperdeck or Ninja 2 - even if you could!
"Bag of Snakes"
D5200 has an external audio input with level controls - YAY!! sorry to piss on your fireworks but the external input has an appalling noise ceiling, making it useless for even the most amateur use - meanwhile the internal camera mic suffers less from amplifier hiss
"Grain and Gain"
When set to manual control of video settings such as iso, F-stop and shutter speed, the visual noise levels increase as you zoom in - indicating that the iso level is changing to compensate for the aperture change during the zoom. Brightness does not increase, but the overall noise level does.
"Alias Moiré and Jello"
On the up side, this camera shows almost no moiré or aliasing at all - good 24MP sensor then - BUT - awful "Jello" so never use this camera with fast moving pans - best stick to
a tripod or slider here and go slow - especially if you are using 24P - depth of field is of course tight as a ducks posterior, so use high F- stops for greater depth when shooting video, if you need it, and try to stick to anything under iso 3200 for least noise.
Update: The extreme Jello effect seen in Live View on the monitor is just that,
only on the monitor, no idea why, but the effect is much reduced on your recorded data.
page 49 of the handbook.
Tuesday 2 April 2013
Video Noise Reduction
Neat Video Noise Reduction software is great, no doubt. You can find it here:
It plugs into loads of things - even Edius.
However, have you considered this? Magic Bullet Denoiser II ?
You can find some information here:
I'm afraid it doesn't plug into quite as many applications, and does not work
with Edius via the AE plugin bridge ....BUT...
give it some thought - as in my humble opinion, it is
BETTER!
it is also really fast now as it supports
GPU acceleration - so before
you follow the crowd, check out the 1.4 version of
Denoiser II
These samples come from a Sony EX1 35mbs. All are shown at 800% enlargement.
The sample frame is identical, noise reduction at default, both running in interlace mode
as the original was 50i.
 |
| original shot at 800% |
 |
| after Neat 3 clean up |
 |
| after Red Giant Denoiser II clean up I find that the detail retention of Denoiser II is better, note the spider web looks smoother with the Red Giant plug, but the detail is retained - I also find there is less in the way of "plastic" colour characteristics with Denoiser II. They are both undoubtedly very good tools. |
Tuesday 5 March 2013
REMOVING ECHO FROM AUDIO
Before you think this is going to cure all those nasty echo problems, it won't, but it may get you out of a spot when you've undertaken that crucial once in a lifetime interview in a tiny, bare dressing room with that Hollywood star who simply had "no time darling" to allow a more suitable venue to be found - too bad, you have your interview but it sounds rough - fine for the news media and stinky old You tube, but rubbish for that documentary you have to get out by the middle of next week.
This will NOT remove the echo (liveness) from the actual words spoken by our hero, but will assist in dumping the awful ambience that makes it sound like you were in a public convenience during your chat.
First off, your interview will need to have been properly recorded, not using a handycam 20 metres away, there's no fix for poor craftsmanship -
First off, your interview will need to have been properly recorded, not using a handycam 20 metres away, there's no fix for poor craftsmanship -
You will need a fairly good audio platform to do this - I used Audition recently to solidify some voice recording, and "pull it forward" - creating dialogue which, whilst not perfect, was certainly absolutely useable in the context of the documentary for which it was recorded.
Geeez, I forgot to finish this post!
1) Open up Audition, import your audio and set to multitrack view.
2) Place your clip on track 1 and copy to track 2 as well, directly below, and set the lower track phase change on.
3) Play the session - you should have silence as the 180 degree phase difference
should entirely cancel out all the audio
4) Now add the Multiband Compressor to the top track and begin to play with
the settings - use the "ganged" setting to start with. Be very careful, take your time, this is not an instant fix.
5) The resulting audio will have all the echoing gaps between the words removed but without the pumping and clipping associated with gating, and the overall dynamic will be reduced - but you will still hear the "live" sound of the echo in the voice - this you have to put up with.
Adjusting the levels within the Compressor very slowly, and maybe setting the master gain in the Compressor to +1.00 will add a little ambience back into the mix.
6) When happy, send both channels to a Bus (mono) This will allow you to add further EQ and noise reduction to the stream without upsetting the echo removal process.
At this stage add EQ to the mix-down Bus - I usually use 30 band, as well as De Esher and or De Esser - if needed.
As the upper middle, and top response get very rounded off in the processing to dampen the echo, it's a fine line between acceptable, then too much EQ or additional processing, least is always best, so go carefully, make a file and test in your project - I often make several versions to get the best results on different sections of the original recording.
Have fun, hope this helps!
Geeez, I forgot to finish this post!
1) Open up Audition, import your audio and set to multitrack view.
2) Place your clip on track 1 and copy to track 2 as well, directly below, and set the lower track phase change on.
3) Play the session - you should have silence as the 180 degree phase difference
should entirely cancel out all the audio
4) Now add the Multiband Compressor to the top track and begin to play with
the settings - use the "ganged" setting to start with. Be very careful, take your time, this is not an instant fix.
5) The resulting audio will have all the echoing gaps between the words removed but without the pumping and clipping associated with gating, and the overall dynamic will be reduced - but you will still hear the "live" sound of the echo in the voice - this you have to put up with.
Adjusting the levels within the Compressor very slowly, and maybe setting the master gain in the Compressor to +1.00 will add a little ambience back into the mix.
 |
| Two tracks with phase change = no audio on playback |
6) When happy, send both channels to a Bus (mono) This will allow you to add further EQ and noise reduction to the stream without upsetting the echo removal process.
 |
| Have the limiter off, carefully adjust levels (ganged is easiest to start with) and play with the overall gain for ambience mix. |
At this stage add EQ to the mix-down Bus - I usually use 30 band, as well as De Esher and or De Esser - if needed.
As the upper middle, and top response get very rounded off in the processing to dampen the echo, it's a fine line between acceptable, then too much EQ or additional processing, least is always best, so go carefully, make a file and test in your project - I often make several versions to get the best results on different sections of the original recording.
 |
adding a bus to create a downstream mono mix for additional EQ and Noise reduction |
Wednesday 27 February 2013
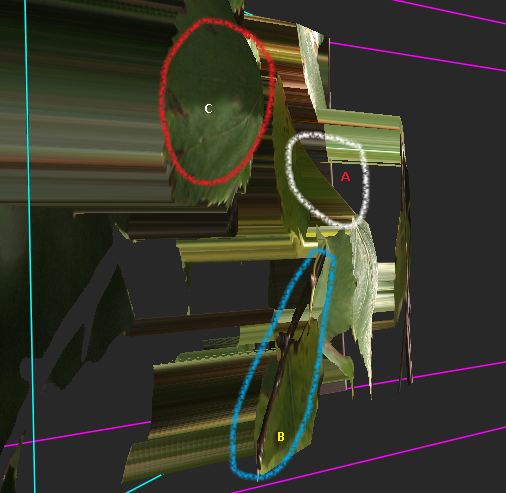
3D Conversion Tests -Depth Mapping

Image shows a still from the depth mapped conversion: source material is a Sony EX1 shot,
the finished clip is shown below:
Anaglyph clip of finished conversion
The shot below shows how the leaf stalk "A" is leaning back
in Z space, as it really does, likewise, the branch "B" has had a similar treatment.
Leaf "C" has had convex distortion centred on it to give the leaf a Z space bulge, imitating it's natural shape on the tree.
Saturday 23 February 2013
FOR PC and NVIDIA USERS
Ever wondered why nothing ever looks right on you PC or Laptop? Everything you use to play media on messes with your set ups, just like that new 60inch screen you took delivery of last week - looks like hell until you turn off all the "auto" settings and align the monitor to deliver an acceptable image from a known source - something you shot, edited and know intimately.
Ever wondered why nothing ever looks right on you PC or Laptop? Everything you use to play media on messes with your set ups, just like that new 60inch screen you took delivery of last week - looks like hell until you turn off all the "auto" settings and align the monitor to deliver an acceptable image from a known source - something you shot, edited and know intimately.
So far so good - look at the video controls available for windoze media player, or VLC or anything else - you can tweak them, but they often get dumped when you change media or when you restart your system - not too helpful.
1) Make a nice mp4 HD file of something you know well - this will play in almost everything, especially if you encode using "Main" profile and not "High" This will stop good old Quicktime Player from freekin out. Use a high data rate like 15mbs. You can also download my two set-up files below if you prefer.
2) Right click on your Laptop or PC monitor and access the NVidia Control Panel, select video at the bottom, and "Adjust Video Colour Settings" Now take control of your system and answer the question "How do you make colour adjustments" answer: "With the Nvidia Settings! This will enable YOU to decide what your media player windows look like and not some random application.
set up as shown here:


These are settings for my Sony Vaio, it stops burn-out and excessive contrast, setting the dynamic range to 0-255 forces the player to show correct black levels as well as unclipped peaks.

Newer NVidia Drivers will display the above options - make sure these are un-ticked.
Now you are in control, set your screen to provide exactly the viewing parameters you need - making it possible to use your laptop as a basic reference - it will never be perfect, but this may help.
If you use Power DVD player, make sure you turn on Nvidia hardware Acceleration which will turn off all the pre-set visual excitement available from Cyberlink, and will render your images to your personal setting.
Use My Files Here:
Black Level Set-Up File
Start with this this black level file, it has 0% black, 5% and 10% with a centre 3% chip. Make sure you can just see the centre 3% chip - and I mean JUST. Start with the controls set to 50% then reduce the brightness one notch at a time and update each time, then play - this is very sensitive - you will find a point when the 3% chip vanishes, just add one and you are ready to adjust the contrast.
Peak White Set-up File
Now open this Peak White set up file, after downloading it. It has a 100% white background, a 98%, 95% and 90% chip. View this file on your media player - can you see all 3 areas? the 98% will just show against the 100% background when correctly set - if not, reduce the contrast setting in your Nvidia Contol Panel in 1% increments until you see the 3 areas - remember to "apply" each change, then play the file (have both windows open at the same time) this will update the player settings each time. This is super sensitive, you really only need to detect the centre 98% chip
Once set, you should be fully aligned and ready to play your files with pretty accurate results.
Oh, here's a Pluge file to identify whether or not your monitor is showing 0-255 or not.
It consists of horizontal bars from bottom to top showing 235-254 and a 254 chip in the centre, it looks like this:

235-255 Pluge File
Subscribe to:
Posts (Atom)